Networking & client IPs
By default, Docker’s bridge network NATs traffic to published ports. For a game server that’s
a problem: the Tribes 2 server (and its admin/ban tooling, e.g. t2csri/bans.cs) needs the
real client IP. Under the default bridge — especially for UDP handled by Docker’s
userland proxy — connections can appear to come from the bridge gateway (e.g. 172.17.0.1)
instead of the player, so per-IP bans and admin tools see one bogus address for everyone.
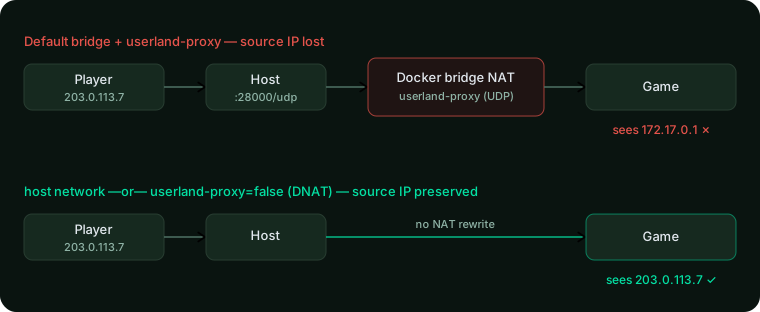
This page covers how to make the original client IP convey into the container. The game’s UDP
port (28000/udp) is the important one; the web panel is covered at the end.
Option A — host networking (simplest, recommended for a public game server)
Run the container in the host’s network namespace: no NAT at all, so the game sees real client IPs directly.
Docker run:
docker run -d --name t2 --network host \
  -e ROOT_PASSWORD='…' \
  tribes2-server:base
Docker Compose — replace the service’s ports: with network_mode: host:
  t2-base:
    # ...
    network_mode: host
    # remove the "ports:" block — host net binds directly
    environment:
      <<: *common-env
      HTTP_PORT: 8080        # the panel binds these on the host directly
      HTTPS_PORT: 8443
Trade-offs:
- No host:container port remapping — the panel binds
HTTP_PORT/HTTPS_PORTand the game binds28000/udpdirectly on the host. Those ports must be free. - Running several servers on one host then means giving each distinct ports (set
HTTP_PORT/HTTPS_PORTper container, and run each game on a different UDP port). - Slightly less isolation (shares the host net stack). For a dedicated game host this is usually fine and is what most game-server images recommend.
Option B — keep bridge + published ports, disable the userland proxy
If you want to keep port mapping and isolation, turn off Docker’s userland proxy so published
ports use pure iptables DNAT, which preserves the client source IP for TCP and UDP. Edit
/etc/docker/daemon.json on the host:
{ "userland-proxy": false }
then restart Docker (sudo systemctl restart docker) and run normally with -p 28000:28000/udp.
This is a host-wide daemon setting. (With the userland proxy enabled — the default — inbound
UDP is relayed by the proxy process, which is what rewrites the source to the gateway.)
Option C — behind a load balancer / firewall
If a NAT/load-balancer sits in front of the host, make sure it preserves the source IP for the UDP game port (most L4/“NLB”-style or simple port-forwards do; L7 proxies and SNAT do not). DNAT without SNAT on your router/firewall preserves the client IP into the host, and then Option A or B carries it into the container.
The web panel (HTTP) behind a reverse proxy
If you put the panel behind nginx/Traefik/Caddy/Cloudflare, the panel sees the proxy’s IP, not
the visitor’s. The proxy should send X-Forwarded-For / X-Forwarded-Proto, and you terminate
TLS at the proxy (leave the panel on plain HTTP, or see TLS). The panel keys its audit
log on the authenticated username, not IP, so this mainly matters if you add IP-based logging,
rate-limiting, or allow-lists in front of it — do that at the proxy layer.
Verifying
- Connect as a player and watch the Console page /
docker logs: admin/ban tooling should show your real IP. With the broken setup, every client shows the bridge gateway (172.17.0.x). - From a shell (the root Terminal page or
docker exec):ss -unap | grep 28000shows live UDP peers — confirm they’re real client addresses, not the gateway. - Test a ban: ban your own IP and confirm it actually blocks you (it won’t work usefully if every client shares the gateway IP).
IPv6 (optional)
For IPv6 game traffic, prefer host networking (Option A), which exposes the host’s IPv6
directly. Bridge IPv6 + NAT adds the same source-IP caveats and requires ip6tables support in the
Docker daemon.
See also
- Building & deploying · Configuration reference · TLS
- Back to docs index